Setup
As covered in the Player Setup section, when configuring a BrightSign player for use, the player must have a “Setup” applied. The Setup contains information such as the intended publishing mode as well as various player settings.
Many of the BrightSign Author capabilities for player management are also accessible in BrightSign Control.
Default Setup
When a player is provisioned and a Setup is not explicitly applied to it, the Default Setup will be applied to the player. The Default Setup can be one of two BrightSign Default Setups or it can be a custom one.
BrightSign Default Setup
See Default Setup File section in the Set Up tab for more information about default setups.
BrightSign Cloud
While BrightSign Author does offer limited functionality without a BrightSign Cloud account, accessing the full functionality of BrightSign Author requires that users be logged in to BrightSign Cloud:
- Launch BrightSign Author
- Sign In (upper right corner) using your email address and password or click New User to create an account.
Player Settings
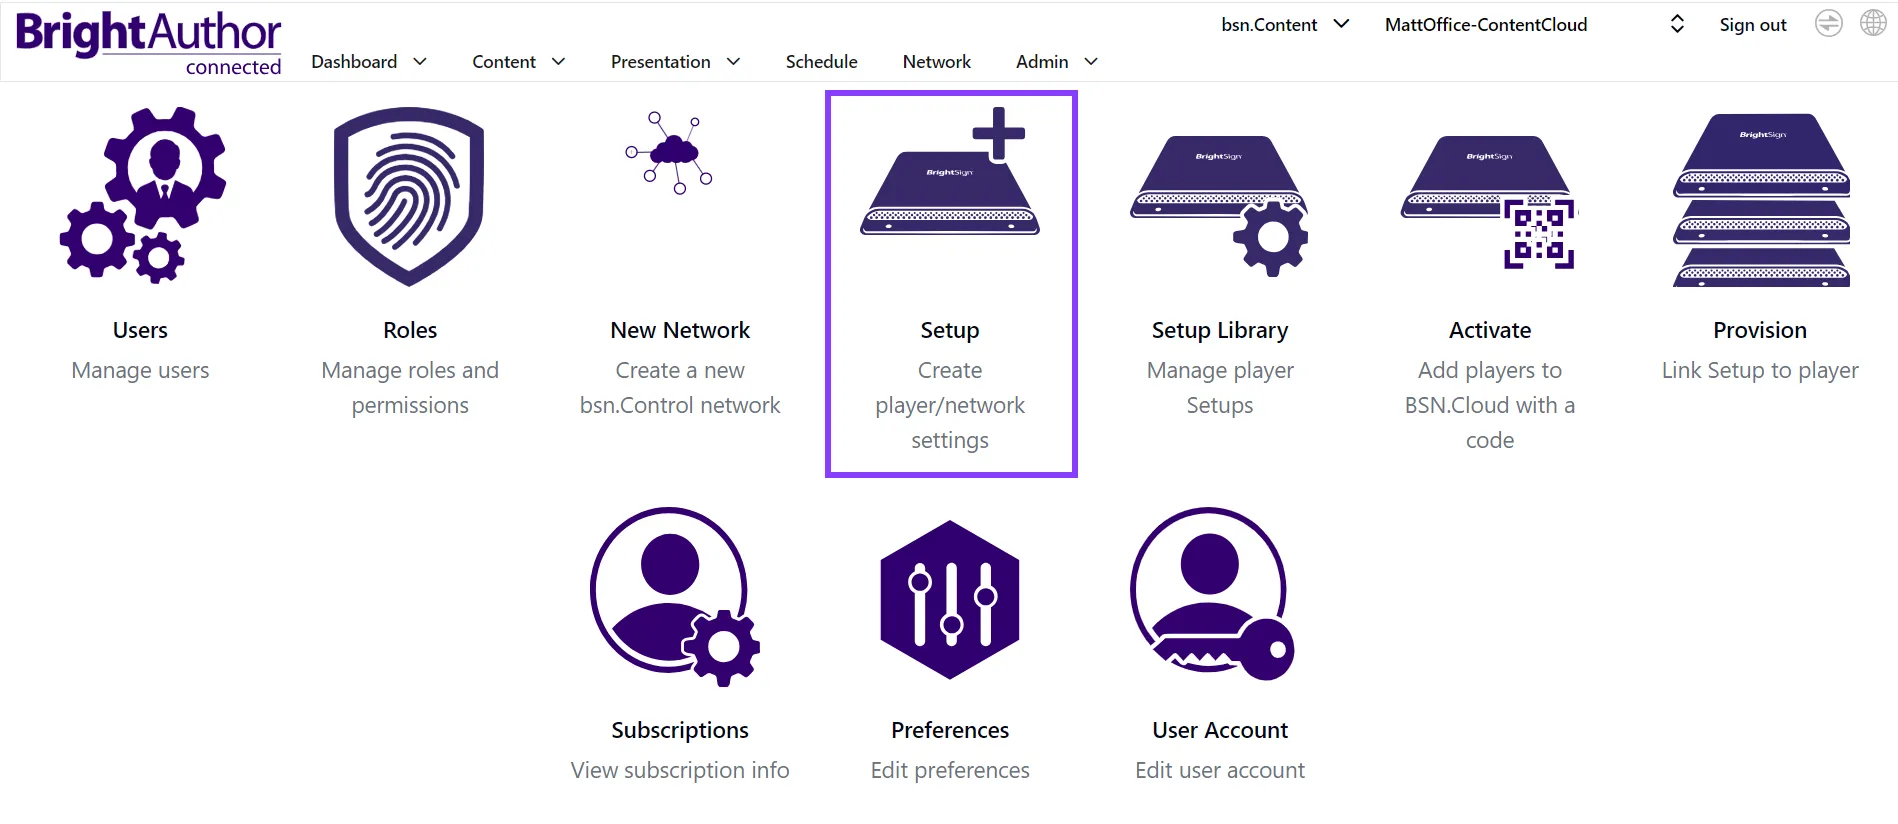
You can configure various player settings in the Setup screen. A Setup File can be created from the option within the Admin tab (Admin > Setup) or via the Setup LibrarySetup Library.
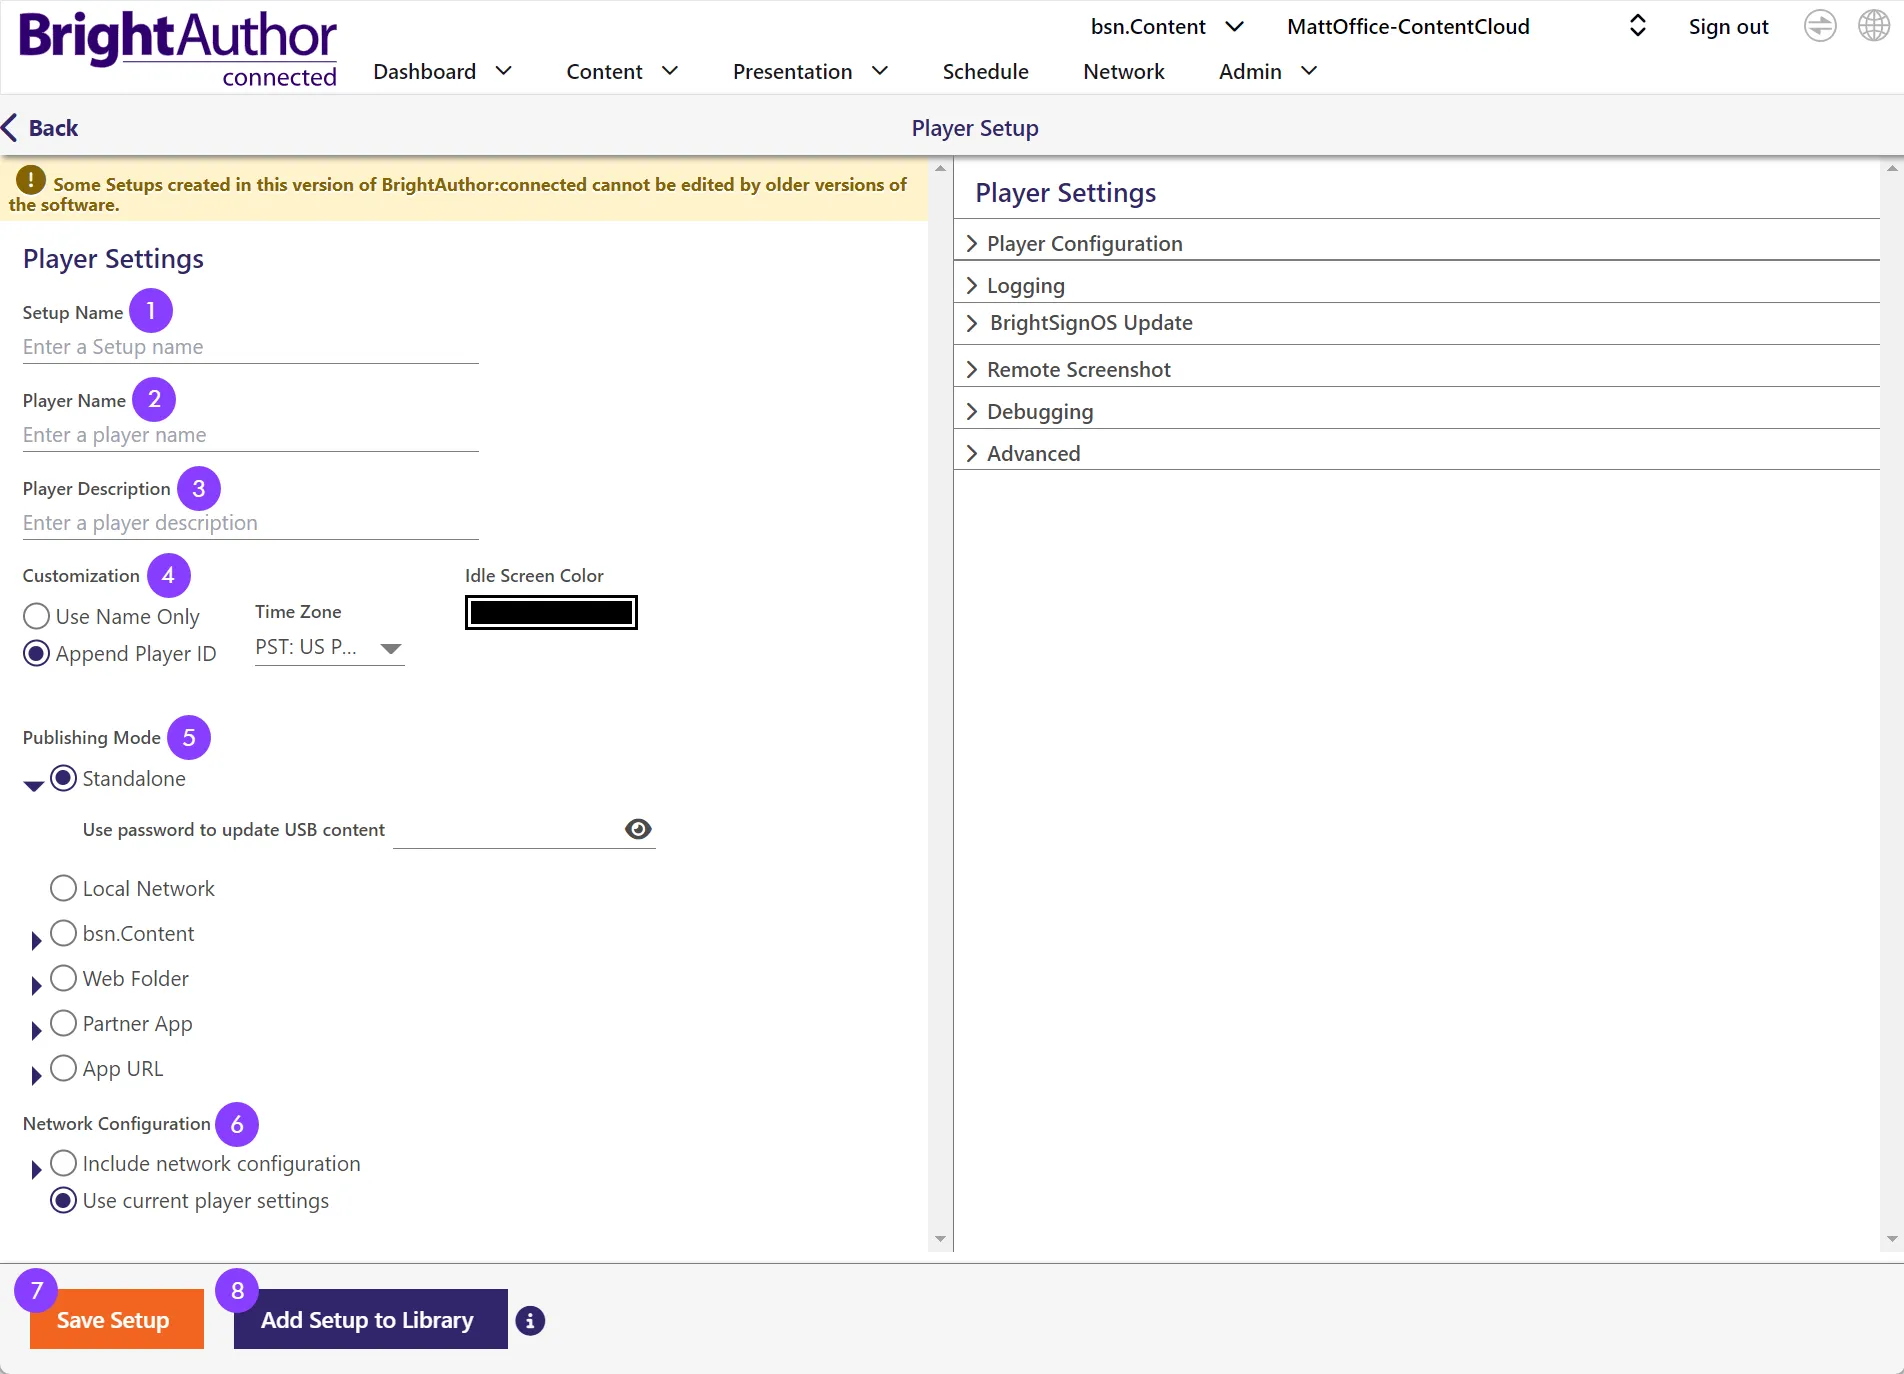
Setup Name
Enter a name for the Setup File.
If you wish to create this Setup File to function as a Default Setup as described above, name the Setup File “Default Setup” (spelling and capitalization as shown, no quotes).
Player Name
Enter a name for the player. All players provisioned with this Setup File will use this name by default. To differentiate between players, the name can be appended with a unique suffix per the Customization section below.
Player Description
Enter an optional description for the player.
Customization
- Append Player ID: Appends the serial number of the player to the end of the Player Name. This option is useful if you're applying the Setup File to multiple players and want each player name to be unique.
- Use Name Only: Does not append anything to the Player Name.
- Time Zone: Select the time zone where the player is located.
- Idle Screen Color: Specify what screen color the player should display if it does not have an active presentation. The default is black, but you should choose a color other than black to differentiate when the screen is on or off.
Publishing Mode
This section specifies the Publishing Mode the player will use. See this page to better understand these modes.
Standalone
This mode involves publishing your presentation to a storage device (such as a microSD card or USB drive) and then manually inserting the storage device into the player. This method is suitable if your player doesn't have a network connection and/or you do not plan to update the presentation frequently.
The USB drive can be used to update the schedule/presentation if you do not want to remove the microSD card and/or it is inaccessible. The USB drive can be used with or without a password: the password protection feature ensures that a player cannot be updated with the Publish for USB update option unless the correct password is supplied. If you choose to require a password, note that the password cannot be changed once configured, and cannot be recovered. See USB Drive Passwords for more information.
Local Network
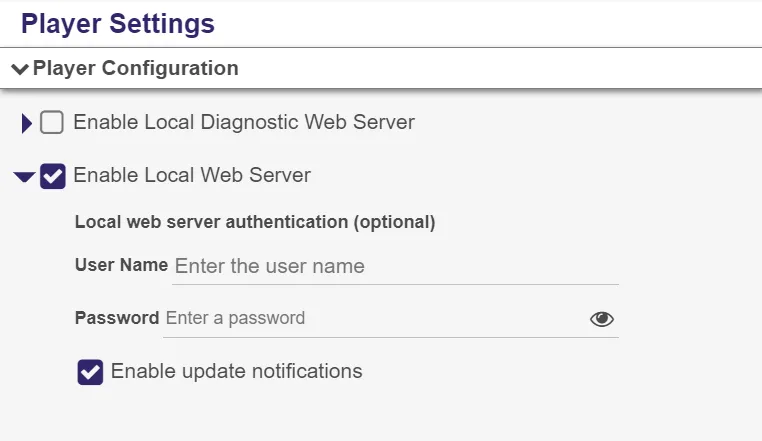
This mode publishes presentations to players over the local network. Players set up for Local Network require the Local Web Server to be enabled which can be done via the Player Configuration part of the Player Settings:
bsn.Content (BrightSign Author Plus)
This mode (which will soon be renamed to BrightSign Author Plus), publishes to players via BrightSign Cloud. It requires a subscription and enables you to remotely schedule and publish presentations.
- Group: Select a BrightSign Cloud group for the player. The player will appear in this group after the Setup File has been applied and can later be moved to other groups if desired. All players in a group receive the same presentation schedule. Groups can be added via the Network tab.
Web Folder
With this publishing mode, presentations/content are placed on a web folder accessible via a URL. A player set up for the Web Folder publishing mode periodically checks the URL for new content and if new content is found, the player downloads the content from the URL.
- URL for Web Folder: Specify the URL from which the player will download content updates. The use of trailing slashes in the URL is not recommended as some web servers do not support trailing slashes. If you're having trouble getting players to communicate with your web server, see Web Folder for troubleshooting tips.
- Content Check Frequency: Set how often you want the player to check the web folder for updates.
- Web Folder Authentication (optional): Enter a User Name and Password to enable authentication between the player and the server.
- Enable basic authentication: Instruct the player to pass credentials to the web server in unsecured packets. Use this option only if it is absolutely required by the configuration of your web server.
Partner App/Partner CMS
Select applications created by BrightSign Cloud integrated partners. See Partner Setup and Recovery for more information about creating a recovery URL for partner applications.
App URL/CMS URL
Specify a URL address to point players directly to an externally hosted application. CMS URL is the current name for this method.
Network Configuration
- Include Network Configuration allows you to set network options in the Network Options window before connecting to your network.
- Use Current Player Settings if the player to be re-provisioned is currently configured on a network which requires a specification configuration (security, certificates, etc.) to maintain your player's current network configuration.
Save Setup
Publish the Setup File manually. Follow these steps to complete the Setup process:
- Save the Setup File to a storage device (e.g., microSD card or USB flash drive). Ensure the Setup File is saved to the root folder of the storage device.
- Turn off the player by unplugging the power adapter (or unplug the Ethernet cable if the player is being powered by PoE).
- Insert the microSD card or USB flash drive into the player:
- Format the microSD card using FAT32 or exFAT. The exFAT format allows you to store files larger than 4GB, but is not supported on the 4Kx42.
- The storage device must remain in the player at all times while playing presentations.
- Turn on the player by reconnecting the power.
Players cannot be migrated from one BrightSign Cloud network to another unless the player provisioning record is first deleted from the old network and created in the new network (see Provision for more information). Otherwise, the player will remain in the old network.
Add Setup to Library
Add the Setup File to the Setup LibrarySetup Library. You can then open the Setup later or provision playersprovision players using the Setup File.
For more info on how to change player types, here is a tutorial video:
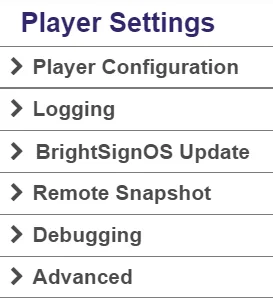
The Player Settings section on the right allows you to configure additional optional parameters.
Player Configuration
Enable Diagnostic Web Server
Enable the Diagnostic Web Server (DWS) and specify a password for the server (the username is always "admin"). You should secure the DWS with a strong password.
- Use default password: Use the player serial number as the password.
- Specify password: The password will be reset to the password you input.
- Disable password: No password is required.
Enable Local Web Server
Enable the Local Web Server, which is necessary for Local Network configured players. This feature enables the Player Web Page, which allows you to update Variables over the local network.
- Username: A username for the Local Web Server login.
- Password: A password for the Local Web Server login.
- Enable Update Notifications: (Optional) Check this box to have the player automatically refresh the Player Web Page whenever variable values change on the player.
You can access the Player Web Page using BrightSign Author or a web browser. To locate the Player Web Page on a web browser, enter the IP address of the player at port 8008 (for example, “10.0.1.199:8008”).
Logs
Use the check boxes to enable/disable logs. Logs can be turned on and will work behind the scenes, but can only be retrieved from the microSD card.
- Playback: Record playback start and end times, zone names, media types, and file names.
- Events: Record timestamps, state names, zone names, event types, and event data.
- States: Record current and last state names, timestamps, and media types.
- Diagnostics: Record timestamps, OS, and script versions, and the current presentation.
- Variables: Record the current and default values of all Variables in the presentation.
- Uploads: This feature is available with the bsn.Content (BrightSign Author Plus) and Web Folder publishing modes. Specify log upload settings:
- On Startup: Check this box to have the player upload its logs to BrightSign Cloud each time it boots up.
- At specific time daily: Check this box to have the player upload its logs daily at the specified time.
- Relative URL for log uploads: If you are using Web Folder publishing, check this box to have the player upload logs to this URL location.
BrightSignOS Update
Use this section to include an OS update file with the Setup. First, determine the behavior of the update file using the Update Type dropdown list:
- Standard: The OS update is applied to the player. The player reboots and deletes the update file after the update is complete.
- Different: The OS update is only applied if the version of the update file is different from the current OS version on the player. The player reboots and deletes the update file after the update is complete.
- Newer: The OS update is only applied if the version of the update file is newer than the current OS version on the player. If the player is booting up in Rescue Mode (Safe Mode / Secure Boot), the update is always applied because the player cannot check its OS version before applying the update. The player reboots and deletes the update file after the update is complete.
- Save: The OS update is applied to the player, but the update file is not deleted from the storage device. The player does not reboot after applying the update; instead, it waits for the storage device containing the update file to be removed.
Next, select the version of the OS update file according to your player model:
- Production Release: The current official release of BrightSignOS
- Beta Release: The current beta release of BrightSignOS
- Minimum Compatible Release: The minimum OS version that supports presentations created by your version of BrightSign Author. The minimum compatible OS may not support all features provided by a contemporary version of BrightSign Author.
- Specific File: Select a .bsfw firmware update file from your hard drive. The other options will download the update file from BrightSign when the setup files are created.
- Update from URL: Enter the download URL for a .bsfw firmware update file. This option is only available when distributing a Setup File via player ProvisioningProvisioning.
Remote Screenshot
If you select the Enable Remote Screenshot checkbox, this feature will be enabled in BrightSign Author. Remote screenshots can be turned on and will work behind the scenes, but can only be retrieved from the SD card. This feature has the following options:
- Remote Screenshot Interval: Specify how often the player should take a screenshot of the presentation display in minutes.
- Maximum Number of Images to Save: Specify how many JPEG screenshot images can be stored on the local storage of the player.
- JPEG Quality Level (1-100): Specify the quality level (and thus the file size) of each image file.
- Screen Orientation: Images can be rotated to Landscape or Portrait mode.
- Relative URL for Remote Screenshot Handler: Post screenshots to this endpoint (only available for the Web Folder publishing mode).
Debugging
- Enable Serial Debugging: Enable serial debugging on the player. The autorun script will output debugging information related to the presentation to the serial port (as well as over Enable Telnet & SSH if these features are enabled).
- Enable System Log Debugging: Enable system-log debugging on the player. The player will output system log information to the Log tab in the Diagnostic Web Server (or the Serial/Telnet/SSH ports if these are enabled via the Serial Debugging option).
Advanced
- Enable bsn.Control or bsn.Content: Enable the persistent WebSockets connection between the player and BrightSign Cloud servers. This allows players to access BrightSign Author or BrightSign Author Plus.
If you disable the WebSockets connection, there is no way to enable it again remotely. You will need to perform player set up locally via a storage device to reenable this feature.