Create a BrightWall on BSN
This page / section pertains to BrightAuthor Classic, our legacy app. BrightSign Author is our latest app for managing content and players.
Development of BrightAuthor Classic has largely ceased and the app will eventually be deprecated and replaced with BrightSign Author.
Creating a BrightWall and distributing a BrightWall presentation to it via the BrightSign Network (BSN) requires several steps within BrightAuthor Classic. Follow these steps to create a BrightWall group, create a BrightWall within the BrightWall group, and publish your presentation to the BrightWall group:
- Sign in to your BrightSign Network account by navigating to Tools > Sign In to BrightSign Network.
- After creating your BrightWall presentation, click the Upload to network button in the top-right. This will upload both the BrightWall presentation and BrightWall configuration file to the BrightSign Network.
- Navigate to the Manage > Status tab and expand the BrightWall Groups section at the bottom of the screen.
- Click Add BrightWall Group.
- Enter a BrightWall group name and select a BrightWall configuration. The BrightWall configuration will be applied to every BrightWall created within the group. Click OK when finished.
- Once you’ve created a BrightWall group, you will need to set up players as part of the BrightWall configuration as shown in the image above.
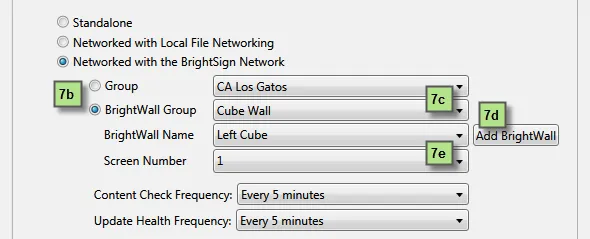
- Go to Tools > Setup BrightSign Unit.
- Select the BrightWall Group option under Networked with the BrightSign Network.
- Use the BrightWall Group dropdown list to select the BrightWall group created in steps 5 and 6.
- Click the Add BrightWall button to add a new BrightWall to the BrightWall group. Enter a BrightWall name and click OK.
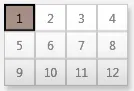
Use the Screen Number dropdown list to specify the section of the BrightWall to which the player belongs. Screens are numbered by row, starting from the top-left section of the BrightWall (the example below the numbering of a 4x3 BrightWall).
- Enter the rest of the player configuration settings as desired and set up the player—see the BrightSign NetworkBrightSign Network SetupSetup page for more details.
- Repeat steps 1 through 6 above to set up every player in the BrightWall—make sure to use the same BrightWall Group and BrightWall Name for all players in the BrightWall.
- Go to the Publish > BrightSign Network tab.
- Select the BrightWall Presentations option.
- Under Select BrightWall Group to Schedule, select the BrightWall group you created in steps 5 and 6.
- Add one or more BrightWall presentations to the schedule—see the BrightSign NetworkBrightSign Network publishing section for more details on scheduling.
- Click Publish schedule. Make sure all the players in the BrightWall are powered up and connected to the Internet. Allow time for the players to download the content, reboot, and synchronize playback.
Add a New BrightWall to the Group
Use the Add BrightWall option during unit setup to add additional BrightWall(s) to the BrightWall group. A new BrightWall will use the same configuration and be scheduled with the same presentations as other BrightWall(s) in the group.
Configuration Files
Each BrightWall presentation within a BrightWall group must use the same configuration file. If you want to create additional BrightWall presentations with different configuration files, you will need to create additional BrightWall groups in the Manage > Status tab.
Retrieve Configuration Files from BSN
If you don’t have the original configuration file (for example, if the user who created the original configuration file is on a different PC), you will need to retrieve it from BSN:
- Go to the Manage > Presentations tab.
- Expand the BrightWall Configurations section.
- Right-click the original configuration file and select Download to save the file to your hard drive.
- When creating a new BrightWall presentation, use the Browse button to locate and select this configuration file.